How to Create a Decision Tree in Visio
Edraw Content Team
Do You Want to Make Your Decision Tree?
We often see business owners face a dilemma in deciding the best possible option for them. In this article, we will compare MS Visio and EdrawMax by outlining some of the most common differences between the two.
What is a decision tree? As the name suggests, decision tree diagrams help evaluate someone's options. We often see business owners face a dilemma in deciding the best possible option for them. In those cases, we work on decision trees as they are an excellent tool that helps everyone (students and professionals alike) in choosing between several courses of action by providing a highly effective structure within which one can lay the correct and incorrect options and investigate the possible outcomes by accessing all the areas. A Visio decision tree is a decision tree created using Microsoft Visio that can be accessed by those who have the licensed version of this diagramming tool.
In this article, to create a decision tree, we will compare MS Visio and EdrawMax by outlining some of the most common differences between the two. By the end, you will also learn how to import the Visio decision tree file in EdrawMax without losing the original formatting.

1. How to Create a Decision Tree in Visio
- Plan the Decision Tree:
- Take a Template and Add Shapes:
- Connect the Shapes & Add the Yes or No option:
- Preview and Save:
A decision tree shows the cause and effect of a decision. You can use Visio to create your decision tree. A decision tree is a flowchart type. However, before you make it, you may make a basic plan to avoid mistakes and complexities. You should know how to make a decision tree and have an idea about the functions of the Visio tool before you start making an actual one. After finalizing the plan, you can open the Visio application on your system.
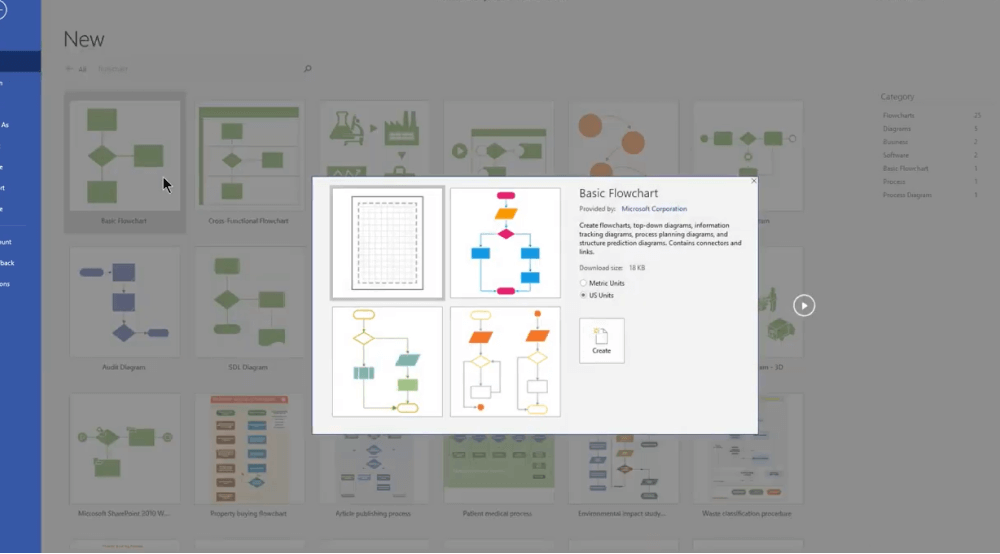
Go to the New of the File option to insert a template. After this, take the shapes that you want for your decision tree. The rectangles and squares are the most preferred shapes for a decision tree. Now, you need to place the shape on your canvas. It will be easy if you have a plan ready at hand. After you add the shape for your question, you need to connect them. You will get the connector tool at the top menu. Double-click on the shape to add the question for your decision tool.
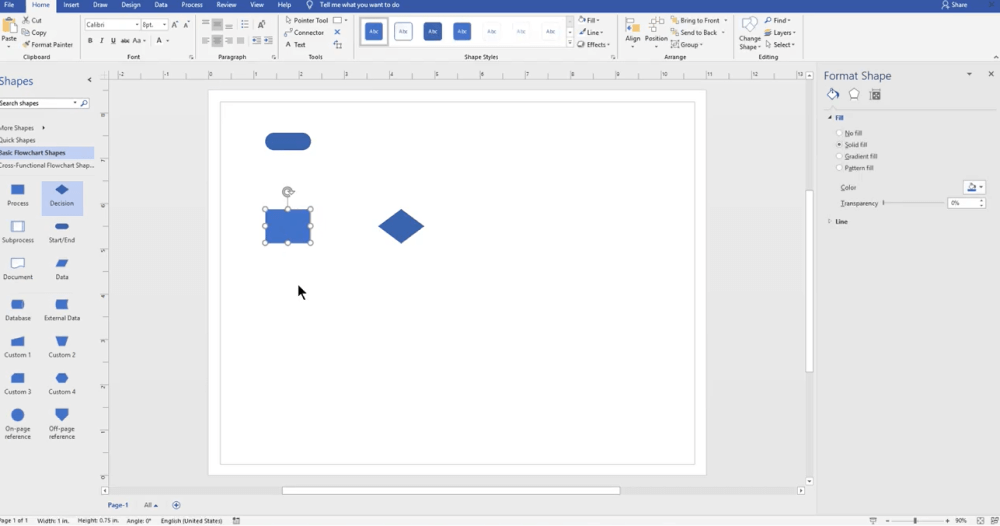
You can double-click on the first shape to have another connected to it. After that, please right-click on the same to add text to it. Now, add yes or no options. You need to add the possible results of the given decision in the boxes taken. Now similarly, add more shapes and outcomes to complete your decision tree. Appropriately, mark the options to stay away from any confusion.
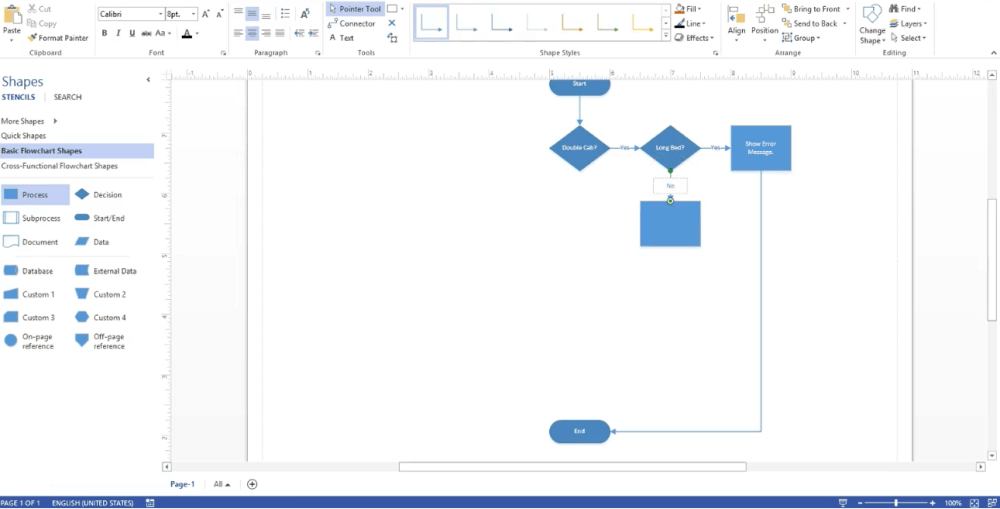
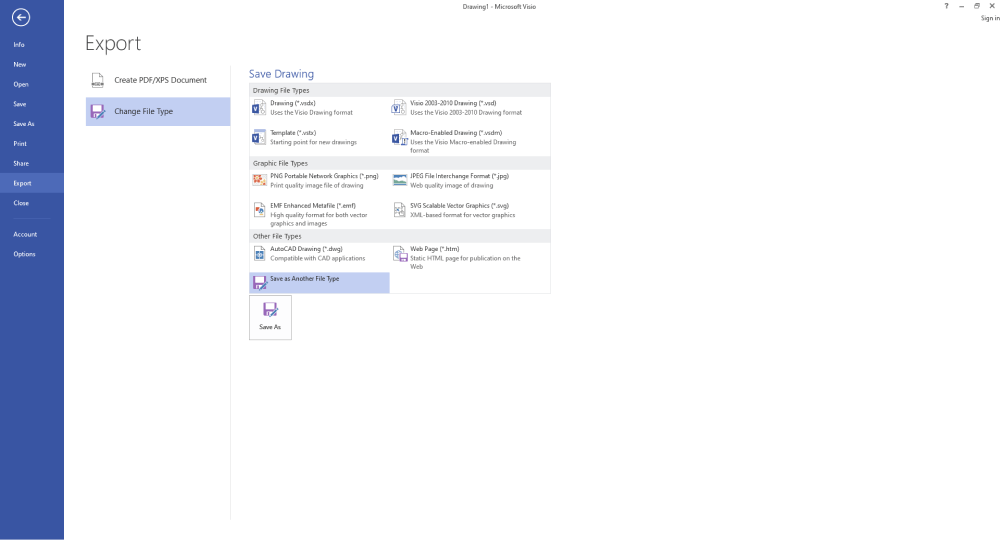
After adding the shapes and texts in your Visio decision tree, you can view it for print. Go to the View option in the top toolbar menu, and you can get a complete view of your decision tree as a print preview. If you are satisfied with your decision tree Visio, you can save it and import it into multiple formats. You may also share it with others or print it for future use. As you saw, making a decision tree in MS Viso requires technical knowledge, and if this is your first time using any diagramming tool, you will find the interface a little too complicated. Instead of this, you can check out the following section, where we have addressed how easily you can create a Visio decision tree without even using MS Visio.
- Plan the Decision Tree;
- Take a Template and Add Shapes;
- Connect the Shapes & Add the Yes or No option;
- Preview and Save;
2. How to Create a Decision Tree in EdrawMax
EdrawMax is a diagramming tool, well equipped with all the required features to create a decision tree. Follow the steps below and start creating the decision tree that you can later export in multiple formats.
Step1 Open EdrawMax & Login
The very first step that you need to follow is to install EdrawMax in your system. Go to EdrawMax Download and download the decision tree maker software depending upon your operating system. If you need remote collaboration with your office team, head to EdrawMax Online and log in using your registered email address.

Step2 Select a Template
If you want to take reference from previously built decision tree templates, head to the 'Templates' section and look for the decision tree. The system will showcase several decision tree templates you can instantly use for personal or professional use.

Step3 Create From Scratch
If you plan to create a decision tree from zero, head to 'Project Management' that you will find under 'Business' and click on 'Decision Tree' followed by clicking on the '+' sign. In the EdrawMax canvas board, start placing decision tree components, like branches and branches of alternatives.

Step4 Add Symbols & Components
EdrawMax has 26,000 vector-enabled symbols that help create different diagrams. You can easily find all the vector-based symbols that are required to create a decision tree on the left side of the canvas board. If you require additional symbols, head to the 'Symbols' section on the top toolbar and check out 'Predefined Symbols.' If you have imported a Visio decision tree file or are working on a pre-built template from EdrawMax, you can start customizing it as per your requirements. From changing the border to updating the background color, you can do all sorts of customizations in this decision tree maker.

Step5 Export & Share
After you are done editing the decision tree template, you can start exporting it into multiple formats, like JPEG, PNG, HTML, PDF, SVG, and more. You can also share the decision tree diagram in multiple Microsoft formats, like Docs, PPTX, and VSDX.

Basically, it is simple to create a decision tree in EdrawMax. Just grab a template, keep customizing, drag and drop professional decision tree symbols to make your drawings better. If you are still confused about how to draw a decision tree in EdrawMax, just check the video below.
3. EdrawMax vs. Visio
Now that you have seen the generic steps to create a decision tree in Visio and EdrawMax, let us see some of the basic comparison factors between these two diagramming tools.
- There is a limitation to preloaded shapes, icons, themes, and templates in Visio. EdrawMax has over 1,500 templates, 26,000 symbols, and over a thousand icons and different shapes.
- With Visio, sharing, printing, and publishing your diagram is difficult. With EdrawMax, you can share, print, or even publish the decision tree in several formats and even on several social media platforms.
- Visio has limitations when it comes to delving deeply into micro information. EdrawMax is a vector-enabled tool and has no issues working around micro information.
In order to create highly-professional diagrams, you will require the assistance of symbols. Some of the most common symbols you can find at EdrawMax's symbol library are Decision Made Node, Chance Event Node, Endpoints, Branches of alternatives, Rejected Alternative, and more. If you do not find any important symbol you are looking for in the symbol's library, you can easily create one using the Pen or Pencil tool option provided by EdrawMax.
EdrawMax also has a Templates Community feature that helps beginners and students to create wonderful decision trees by taking a reference from previously built templates. Some of the most common decision tree templates are Decision Tree for Assets, Interactive Decision Tree, Python Decision Tree Example, Activity of a Day Decision Tree, App Development Decision Tree, and more. Once you have created a decision tree, you can also publish it to the template community, from where you can easily inspire other designers.
Comparison of Decision Tree Features
|
Essentials |
Visio |
Edraw |
|---|---|---|
|
Free or not |
1-month trial |
Freemium |
|
Diagram Types |
42+ |
280+ |
|
Symbols |
5,000+ |
26,000+ |
|
Examples & Templates |
20+ |
1,500+ |
|
Languages |
98 |
11 (English, French, German, Japanese, Spanish, Italian, Portuguese, Russian, Korean, Simplified Chinese, Traditional Chinese) |
|
Pricing |
$309.99 (one-time Standard); $579.99 (one-time Professional) |
$245 (one-time); $312 (one-time, bundled with EdrawMind and EdrawInfo) |
|
Runs On |
Win and Web |
Win, Mac, Linux, and Web |
|
Diagrams, Templates, and Symbols |
Visio |
Edraw |
|
decision tree |
|
|
|
Org Chart |
|
|
|
Network Diagram |
|
|
|
Process Flow Diagram |
|
|
|
decision tree and decision tree Diagram |
|
|
|
Mind Map |
|
|
|
Office Layout |
|
|
|
decision tree |
Only Professional Available |
|
|
HVAC Plan |
Only Professional Available |
|
|
Piping and Instrumentation Diagram (P&ID) |
Only Professional Available |
|
|
Rack Diagram |
Only Professional Available |
|
|
Azure and AWS Diagram |
Only Professional Available |
|
|
Business Process Model and Notation (BPMN) |
Only Professional Available |
|
|
Entity Relationship Diagram (ERD) and UML Diagram |
Only Professional Available |
|
|
Concept Map |
|
|
|
Infographic |
|
|
|
Emergency Exit Plan |
|
|
|
Presentation |
|
|
|
Template Community (A user-generated platform for creating & discovering templates) |
|
|
|
Symbol Library (Create your own symbols and import symbols from external sources) |
|
|
|
Features |
Visio |
Edraw |
|
Infinite canvas and Multipage documents |
|
|
|
Shape drawing & text tools |
|
|
|
Position, alignment, and formatting tools |
|
|
|
Custom diagram theme |
|
|
|
Insert pictures, hyperlinks, notes, comments, and attachments |
|
|
|
Custom diagram watermark |
|
|
|
Insert QR codes |
|
|
|
Area auto-calculation (decision tree) |
|
|
|
Cloud Storage |
|
|
|
Formula editor |
|
|
|
Encrypt files |
|
|
|
Auto formatting |
|
|
|
Focus mode |
|
|
|
Custom Shortcut keys |
|
|
|
Version History |
|
|
|
File Recovery |
|
|
|
Import & Export |
Visio |
Edraw |
|
Import from Visio and Visio Stencils |
|
|
|
Import from SVG |
|
|
|
Export to Visio |
|
|
|
Export to PDF, SVG, HTML, and Graphic Files |
|
|
|
Export to Microsoft Word, Excel, and PowerPoint |
|
|
|
Export to EPS |
|
|
4. Free Decision Tree Maker
With over 25 million registered users, EdrawMax is the best alternative to MS Visio for creating complex diagrams for academic and business purposes. Some of the most common features of this free decision tree maker are:
- EdrawMax lets you easily import and export Visio files, allowing you to collaborate better when exporting the Visio decision tree diagrams.
- This free decision tree maker offers over 1,200 pre-built templates that help create over 280 diagrams -- way more than what Visio has to offer to its licensed users.
- The free version of EdrawMax helps in quickly creating some amazing diagrams.
- This free decision tree maker is highly compatible with Windows PC, macOS and Linux. Often such tools have problems in compatibility with the web versions, but EdrawMax is 100 percent compatible with all the platforms.
- EdrawMax allows you to securely save your file to your personalized cloud space so you can access them from anywhere.
5. Final Thoughts
As illustrated in this article, the decision tree is a graphing technique that uses a branching method to visualize every possible output for specific input. Even in software development, mostly in machine learning, decision trees are considered one of the most important visualization tools for classification and prediction. In order to create complex decision trees with several layers of prediction, you need a simpler tool that provides you with free templates and symbols.
Something like EdrawMax, which is created by professionals keeping one thing in mind -- diagramming should be simpler and affordable to everyone. You can even import the Visio decision tree in EdrawMax to customize or modify it as per your requirements and later export it back to VSDX format. EdrawMax also lets you share the Visio decision tree on different social media platforms, as suggested in the above sections. Download this decision tree maker today and start creating and sharing some amazing decision tree diagrams.

Decision Tree Complete Guide
Check this complete guide to know everything about the decision tree, like decision tree types, decision tree symbols, and how to make a decision tree.


