How to Read Electrical Schematics
Part 1: Recognizing Basic Electrical Schematic Symbols
Electrical schematics are the maps for designing, building, and troubleshooting circuits. Learning how to read and understand schematics will be easy for beginners with recognizing basic schematic symbols.
Here are some of the standard and basic symbols for various components for electrical schematics.
1. Resistors are the fundamental components of electrical schematics. They are usually represented by zig-zag lines with two terminals extending outward. But you can also use the alternate rectangle symbol in the drawing.

2. Capacitors have different types that are in common use. It is a device that stores electrical energy and usually has two terminals, which can be connected to the rest of the circuit.

3. Inductors are usually represented by a series of curved bumps or several loopy coils.

4. Switches: the SPST (a single-pole/single-throw) is the most basic switch. It has two terminals with a half-connected line representing the actuator. Switches with more than one throw can add more landing spots for the actuator.

5. Power Sources mainly have two types, DC or AC Voltage Sources. They represent either the source is supplying direct current (DC) or alternating current (AC).

6. Digital Logic Gates: Standard logic functions all have unique schematic symbols such as AND, OR, and XOR. Adding a bubble to the output negates the function, and you will get NAND and XOR.

Undoubtedly, there are many electrical schematic symbols not mentioned on this list. But these above should be enough for a beginner in schematic reading. Then we'll talk about how those symbols are connected on the schematics.
Part 2: Recognizing Names and Values of Schematic Symbols
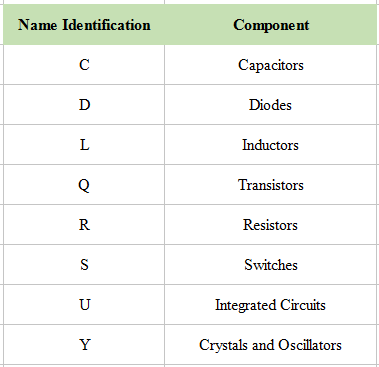
Name: In addition to the symbols, every component on electrical schematics has a unique name and value, which further helps to identify what it represents. Component names are usually a combination of one or two letters and sometimes a number. The message in the name determines the type of component, every component's name on an electrical schematic should be unique. If you have more than one resistor in an electrical schematic, then name them R1, R2, R3, and so on.

Value: Values can help define exactly what a component represents. For schematic components like resistors, capacitors, and inductors, the value tells us how many ohms or farads they have. But for integrated circuits, the value may be the name of the chip.
Part 3: Recognizing Connection and Lines in Electrical Schematics
Understanding the representation of symbols and components is just the primary stage in reading electrical schematics. Next, you need to identify how the symbols are connected and how to figure out their connections.
1. Nets are lines that will show how components are connected.
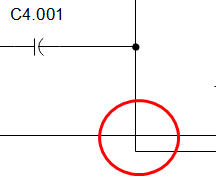
2. Junction is when a wire splits into two or more directions, and it creates a junction. But a junction only means wires passing by but not connected.

3. Nodes show that wires that are crossing this junction are also connected.

Part 4: Create an Electrical Schematic By Yourself
After you have learned about how to read and understand an electrical schematic, now, you can find and use a powerful yet easy-to-use schematics maker and make an electrical schematic to represent the phisical connections and layout of an electric circuit.


