How to Draw a Reflected Ceiling Plan
Edraw Content Team
Do You Want to Draw Your Reflected Ceiling Plan?
EdrawMax specializes in diagramming and visualizing. Learn from this article to know everything about how to draw your reflected ceiling plan with ease. Just try it free now!
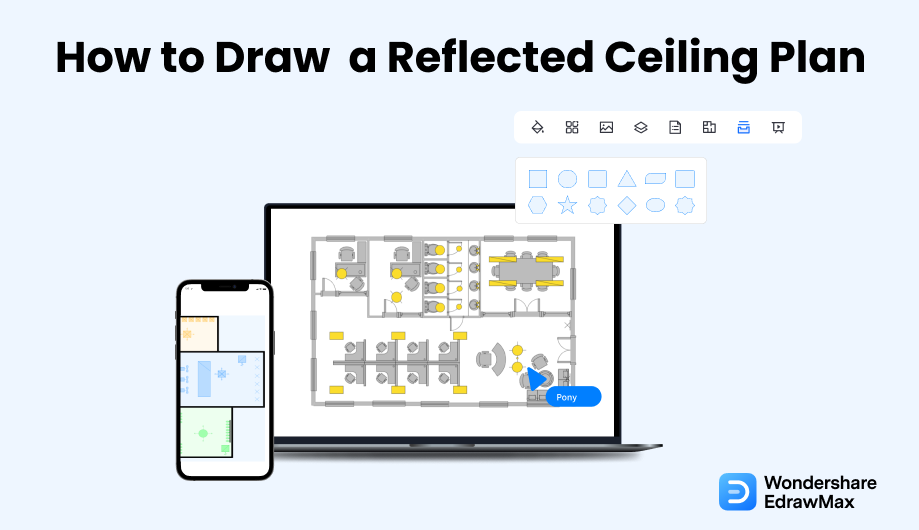
A reflected ceiling plan is a graphical illustration that depicts the items located on the ceiling of a room. In a well-defined reflected ceiling plan, you will find electrical wiring, ceiling treatment, information about multiple components, patterns, and other important components that you might mount from the ceiling, like light, CCTV camera, etc.
After completing this RCP guide, you will finally be able to draw a reflected ceiling plan using the free templates and symbols provided by EdrawMax. However, before we dive into the ways of drawing an RCP for your building compound, let us help you understand what is included in a reflected ceiling plan and what were the traditional ways of creating a reflected ceiling plan.
1. What Includes in a Reflected Ceiling Plan
A RCP is a drawing that shows you the dimensions, required materials, and other key information about the ceiling of each room you have illustrated in your building's blueprint. Several important features are included in a reflected ceiling plan drawing; some of them are:
- Dimensions of the ceiling, including the ceiling height above the constructed floor.
- Specifications on different types of ceilings are also included in a reflected ceiling plan.
- It is a good practice to include the specifications of the finished ceilings in your RCP.
- Always mention the legends and labels for everyone to understand the reflected ceiling plan.
- It is always appreciated if you include HVAC systems, CCTV cameras, smoke detectors, and other features in your reflected ceiling plans.
- Dimensions of the ceiling;
- Specifications on different types of ceilings;
- Specifications of the finished ceilings;
- The legends and labels;
- HVAC systems, CCTV cameras, smoke detectors, and other features, if necessary.
2. Preparations for Drawing a Reflected Ceiling Plan
The primary function of the reflected ceiling plan is to allow the interior designers or the architects to understand how the lighting functions in the room. So, when you start drawing a reflected ceiling plan, there are certain preparations that you need to do. Some of the most important ones are:
- Always understand the basic layout of the room.
- It is a good practice to note all the furniture you would want in your room. It will surely come in handy when you start making the reflected ceiling plan.
- Any RCP is incomplete without mentioning wiring, appliances, and fixtures.
- If there are some special designs that the client requires on the ceiling, you should make a list of them and try to incorporate the same on the reflected ceiling plan.
3. How to Draw a Reflected Ceiling Plan in General
There are two ways of drawing a reflected ceiling plan -- one is an old-age traditional way where you sit down with pen and paper to jot down everything, and another is where you use free templates provided by EdrawMax. Before we walk you through the steps of creating the RCP using the free templates and symbols, let us provide you with the traditional way to draw a reflected ceiling plan.
- Analyze the site:
- Discuss with a contractor:
- Create a layout:
- Add floor plan:
- Add ceiling features:
- Revision:
The first step of creating the reflected ceiling plan is to understand the site and the floor plan and note the room's height.
Even if you have measured all the dimensions perfectly, you should discuss it with your contractor, who would help you in understanding all are the important features that they wish to incorporate into the ceiling.
Once you have measured everything, it is time to create the outline. Ensure that the ceiling dimension that you use should be the exact size of the floor plan.
Without understanding the floor plan, it would be problematic for you to draw the reflected ceiling plan. Always add some furniture or similar elements to make it clear for the viewer to understand that the furniture is placed on the lower plane.
Some of the important ceiling features you can add to RCP are ceiling fans, alarm systems, lights, smoke detectors, etc.
After adding the ceiling features and components, you should check the site again to do multiple rounds of revisions. If you have added a particular feature and your builder or constructor says that it will not go with the design, you should be able to make the appropriate changes.
- Understand the site and the floor plan;
- Discuss with a contractor;
- Create a layout;
- Add floor plan;
- Add ceiling features;
- Check the site again to do multiple rounds of revisions;
4. How to Draw a Reflected Ceiling Plan in EdrawMax
Now that you are wondering how to draw a RCP? Well, there are basically two ways that you can follow. The first method is to draw a RCP from scratch using EdrawMax, and the other method is when you work smartly and choose templates provided by EdrawMax. Here we will walk you through the basic ways of drawing a RCP.
4.1 Draw a RCP from Scratch
Step1 Login to EdrawMax
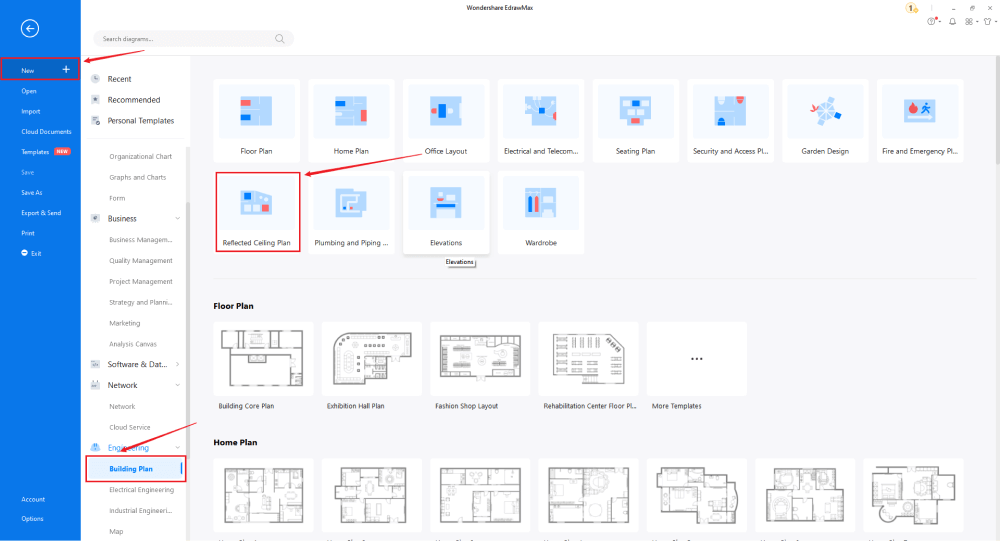
If you are using the offline version of EdrawMax, then open the tool in your system. If you wish to have remote collaboration, head to EdrawMax Download and log in using your registered email address. If this is your first time using the tool, you can register yourself using your personal or professional email address. Go to 'Building Plan' and click on 'Reflected Ceiling Plan.'
Step2 Open a New Canvas
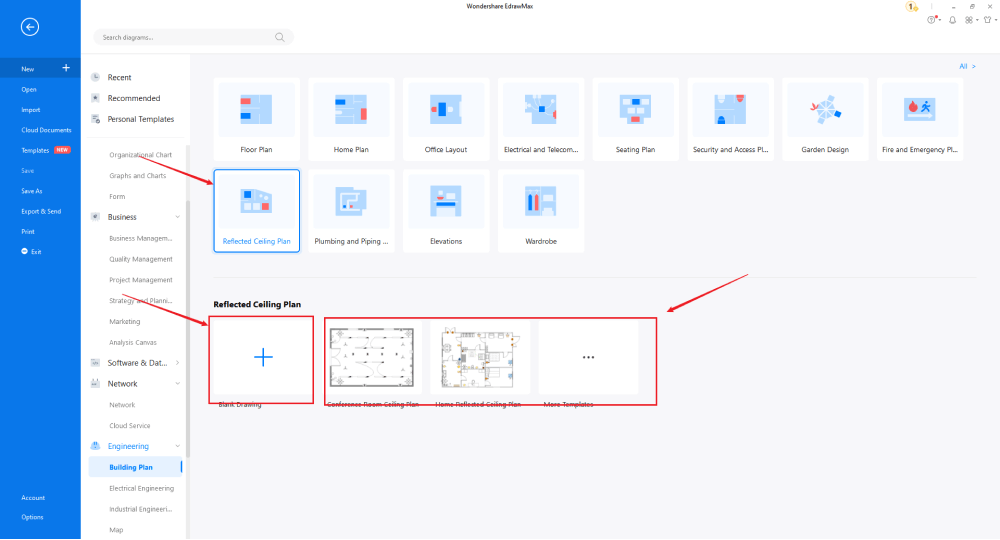
Since you are creating the home plan from scratch, you can click '+.' At the same time, click on 'Reflected Ceiling Plan' to access free templates. After clicking on '+,' It will open up the user-friendly EdrawMax canvas. Create the basic outline and properly scale it as per your measurements.
Step3 Find RCP Symbols
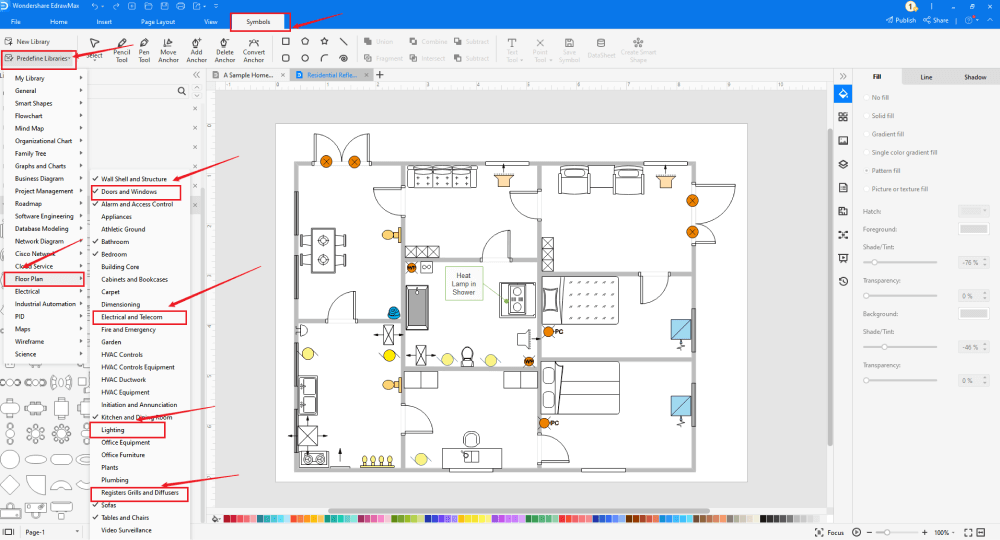
Every reflected ceiling plan diagram is incomplete without symbols. Head to the 'Symbols' section and click on the 'Predefined Symbol' section from the top toolbar. Click on 'Lighting,' 'Registers Grills and Diffuser,' 'Electrical & Telecom,' and 'Doors and Windows' to drag and drop each office layout symbols in your canvas. If you don't find the proper symbols, you may import or create your own symbols with ease, and save to your symbol libraries for later use. Learn more RCP symbols guide and find symbols you want here.
Step4 Add More Elements
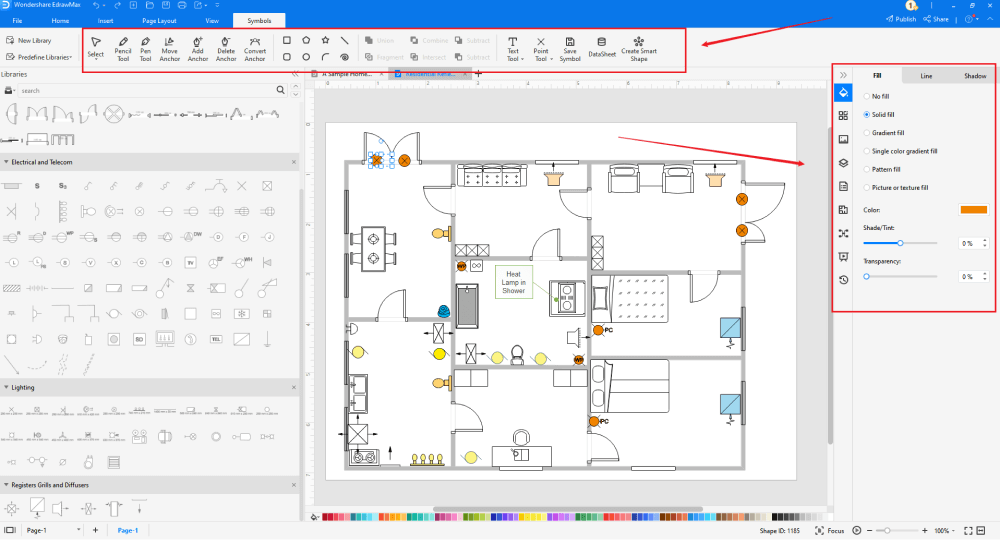
Once you have imported all the symbols, you can start placing them in the seating design that you have created in Step #2. You can add 'Lighting,' 'Registers Grills and Diffuser,' 'Electrical & Telecom' to your RCP. Depending upon your need and theme, you can modify these symbols without worrying about losing the formatting of the drawing. Then, use toolbars on the top or right side of canvas to change the color, font, size, theme, and more with one click.
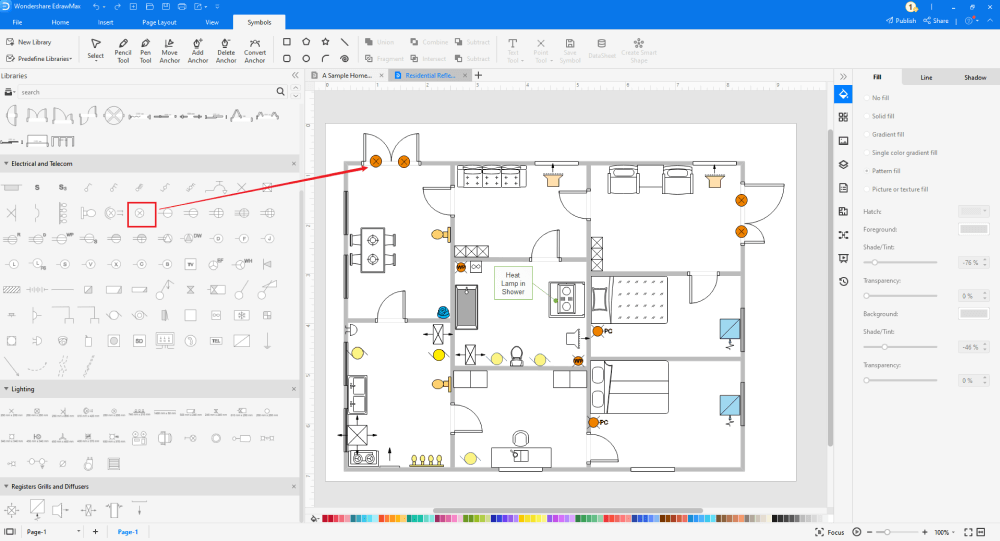
Step5 Save & Export
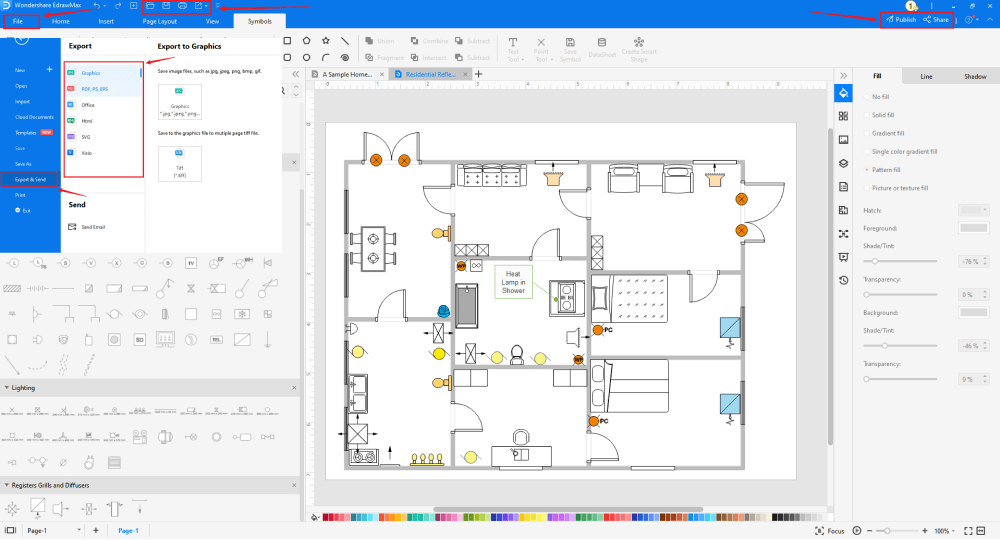
After designing the reflected ceiling plan, you can export it into multiple formats, like JPEG, JPG, PNG, PDF, and other Microsoft formats, like MS Word, MS Excel, PPTX, etc. You can also share> the reflected ceiling plan on different social media platforms, like Facebook, Twitter, LinkedIn, etc. Moreover, you can print your HVAC plan for showing with others.
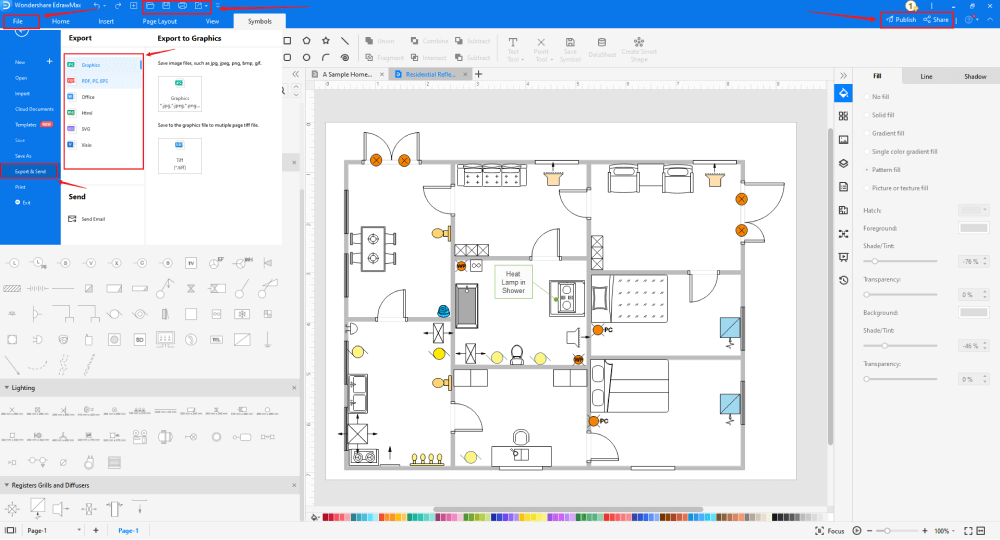
4.2 Draw a RCP from Templates
Step1 Login to EdrawMax
If you are using the offline version of EdrawMax, then open the tool in your system. If you wish to have remote collaboration, head to EdrawMax Download and log in using your registered email address. If this is your first time using the tool, you can register yourself using your personal or professional email address. Go to the 'Templates' section on the left and type 'reflected ceiling plan.'

Step2 Choose a Template
In the template community, you will find hundreds of built-in templates readily available to use. Choose any templates that closely resemble your ideal, reflected ceiling plan and duplicate it to 'Use Immediately.'
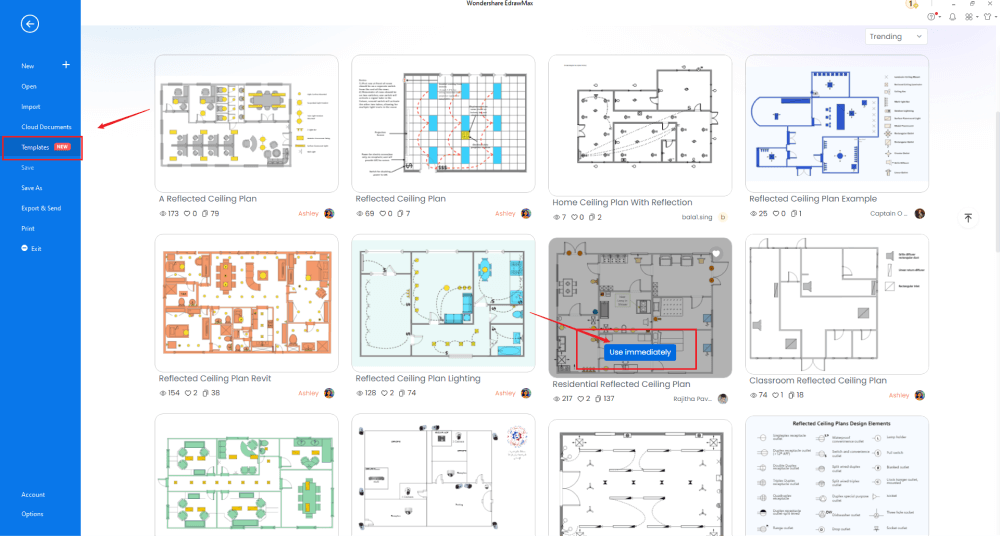
Step3 Add RCP Symbols
Every RCP diagram is incomplete without symbols. Head to the 'Symbols' section and click on the 'Predefined Symbol' section from the top toolbar. Click on 'Lighting,' 'Registers Grills and Diffuser,' 'Electrical & Telecom,' and 'Doors and Windows' to import them to your library.
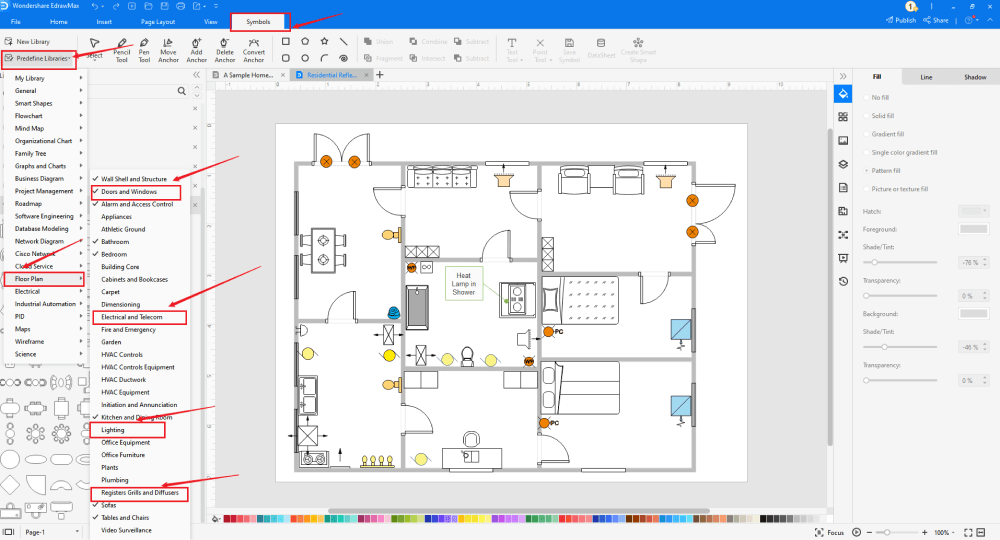
Step4 Change Details
Once you have imported the free built-in template to the EdrawMax canvas, you can change basic details. From the imported symbols, you can add or modify the basic RCP details that you deem fit necessary for the current requirement. Just choose the toolbars on the top or right side of canvas, and find the functions you want.
Step5 Export or Publish
Once your reflected ceiling plan design is ready, you can export it to multiple formats as mentioned above or publish it to the template community for the other 25 million registered users to see and get inspired by your design. Click the "Publish" button on the top right area of the canvas, and fill in your template details, like template title, description, and tag to share your drawing with others.
Basically, it is simple to draw a reflected ceiling plan in EdrawMax, just grab a template and keep customizing, drag and drop professinal reflected ceiling symbols to make your plan better. If you are still confusing about how to draw a reflected ceiling plan in EdrawMax, just check the video below, or learn more from our Youtube channel.
5. Tips & Consideration
A reflected ceiling plan (RCP) is a print that shows you the dimensions, materials, and other key information about the ceiling of each of the rooms represented on your blueprint. Depending upon your expertise and the time in hand, you can either go with the general method to create the entire reflected ceiling plan from scratch or use the free templates provided by EdrawMax to draw the reflected ceiling plan easily.
Advantages of making from scratch:
- You can create the reflected ceiling plan as detailed as you want.
- Since you would be creating the reflected ceiling plan from scratch, you would incorporate multiple symbols into it.
- It would be easier for you to do revisions.
Advantages of making from templates:
- You can create a reflected ceiling plan in just a couple of minutes.
- With free templates, you do not have to worry about the formatting or technical aspects of the RCP.
- You might get some good ideas to implement in your reflected ceiling plans from the existing templates.
5.1 Symbol Libraries
Several important symbols fall under reflected ceiling plan. Some of the important reflected ceiling plan symbols are Lighting Symbols, Electrical & Telecom Symbols, Diffuser Symbols, Sensor Symbols, HVAC Symbols, Fire and Security Symbols, and Ceiling Fan Symbols.
At EdrawMax, you will find all these detailed symbols that will help you create the reflected ceiling plan designs. You have to go to the predefined symbol section and choose the one you are looking to incorporate into your current design.
5.2 Template Community
EdrawMax has a rich template community that expands to 25 million registered users. From Flowcharts to network diagrams, you can find thousands of free templates in the template community section. In the template community, you will find hundreds and thousands of templates of different diagram types, ranging from network diagrams to flowcharts to science diagrams to architecture diagrams. When you create your diagram, this free reflected ceiling plan software also lets you publish your design to the template community, where it can inspire other designers just like yourself.
6. Free Reflected Ceiling Plan Software
Drawing a reflected ceiling plan may sound like a very complex process. However, in reality, it is pretty similar to drawing a floor plan or a building plan. All you need is access to the right tool. As we saw here in the RCP guide, drawing a reflected ceiling plan using EdrawMax is pretty simple as the tool offers free reflected ceiling plan examples. There are several other important features of using this free reflected ceiling plan software, like:
- EdrawMax comes with over 50,000 vector-enabled symbols that can easily be resized, recolored, and reshaped. You can also easily import icons and shapes to create your personalized symbols.
- This free reflected ceiling plan software offers an online version that lets you easily have real-time remote collaboration with your team.
- EdrawMax now comes with a dark and focused mode. Depending upon your mood, you can change the theme of the entire software.
- With this free reflected ceiling plan software, you get an architect's scale that lets you correctly measure all the dimensions of the roof, including the scale of the entire plan.
- EdrawMax has free reflected ceiling plan templates for diagramming need. Just head to the template community section and type the diagram you want. This free reflected ceiling plan will instantly provide you with all the free templates related to that particular diagramming set.
7. Final Thoughts
As you learned from this complete guide to understanding the importance of a reflected ceiling plan, there are traditional way, and then there is an easy way to draw a RCP for your house. If you are an architect or an interior designer, you will find that RCP serves a much higher purpose than simply elaborating the structure of the ceiling of any building. It includes the ceiling design and covers HVAC mounts, sprinklers, fixtures, and more.
With EdrawMax, you can easily change the dimension, modify the vector-enabled symbols, import floor plans to work around the RCP, and add hundreds of important symbols. As for this free reflected ceiling plan software, you can work with all the different types of elements that will enhance the technical aspects of your reflected ceiling plan.
Reflected Ceiling Plan Complete Guide
Check this complete guide to know everything about reflected ceiling plan, like reflected ceiling plan types, reflected ceiling plan symbols, and how to make a reflected ceiling plan.
You May Also Like
How to Draw a HVAC Plan
How-Tos
How to Design a Garden Plan
How-Tos
How to Make a Gantt Chart on Mac
How-Tos
How to Make a P&ID in Visio?
How-Tos


